If you find that a network connection is not established between your printer and the computer you are using, there are basic troubleshooting steps you can follow to ensure you have a stable connection.
Follow the instructions below
- Make sure your printer is picking up an IP address. Verify that the IP address is in a range that can be seen by your computer. If your printer’s IP is 192.168.1.xxx, your pc should be a 192.168.1.xxx.Anything other than this IP range may not connect to the machine.
- Open a command prompt, and key in the following command: ping 192.168.1.xxx or depending whichever the printer’s IP address is. If you get a reply, this is a good step. If you do not receive a reply, your printer is not able to be seen by your PC how it is currently connected.
- Plug your network cable into the switch or router (not directly into the Ethernet port on your PC) as some PCs cannot support this connection).
- Next, verify firewall or virus protection is not blocking the connection to the printer from your computer.
- At this point, if you see that a network connection is not established, we recommend seeking the assistance of a computer expert.
Connecting Your Printer to the Internet
Cable Connections
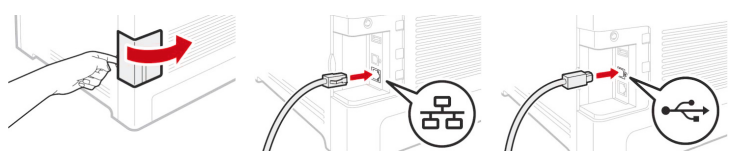
- Open the side panel to reveal the communication ports.
- Insert either the USB or Ethernet cable, depending on how you want the RIP to communicate with the printer.
- NEVER use both ports at the same time.
IMPORTANT NOTE: If you are connecting via Wi-Fi, it is not necessary to connect either the USB or Ethernet cable.
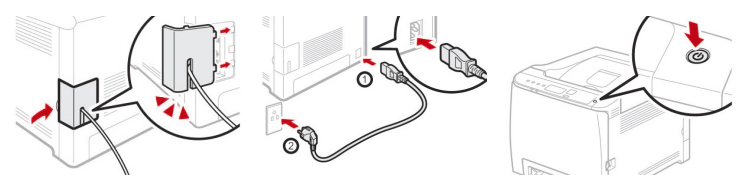
- Feed the cable through the cover and reinstall it.
- Insert power cord and power on the printer
Connecting to Your Printer Via Wi-Fi
For a detailed overview of how to connect your computer to your printer via a wireless network, please take a look at the wireless setup section of your Luminaris 200 White Toner User’s Manual. In this section, you will find helpful steps you can use to successfully establish a network connection.
Need Additional Assistance?
Please don’t hesitate to reach out to us for further assistance via email at service@ricoma.com or by visiting our support page at www.ricoma.com/US/support.