RICOH Ri 1000 and Ri 2000 printers are designed for Direct-to-Garment (DTG) printing, which means they process a digital image design and print it directly onto a garment using specialized ink jet technology.
But it’s also possible to use your DTG printer for Direct-to-Film (DTF) projects. Watch this video and follow the steps below to learn how to do so.
What Is Direct-to-Film (DTF) Printing?
Direct to Film or DTF is a process that transfers prints onto fabric or other substrates using a heat-press mechanism. Unlike the DTG method, which only works on cotton fabrics, the Printer DTF method can work on cotton and poly blends.
To use your DTG printer for Direct-to-Film (DTF) projects, follow these easy steps:
- If you haven’t done so, upgrade your DTG printer to the latest firmware. We have the most recent version at customer.ricoma.com, under the product tab with instructions on how to install.
- Next, download the latest version of ColorGate software version PS 21. It may cost money to upgrade.
- Afterward, make sure you have a supported DTF film.
- Also ensure you have a white powder solution for DTF use on hand.
General Settings for Direct-to-Film (DTF) Printing
Height Settings
- Ri 2000 – set by auto height with a standard platen
- Ri 1000 – set to 0 or at the most 1
- For both printers use a little alcohol on the table underneath the film to hold it flat during printing.
- If you use tape to hold in place, be sure the tape does not add more height to the print.
RIP Settings
- Color Tab – Media Black Garment: Metamode Fine 600 x 600
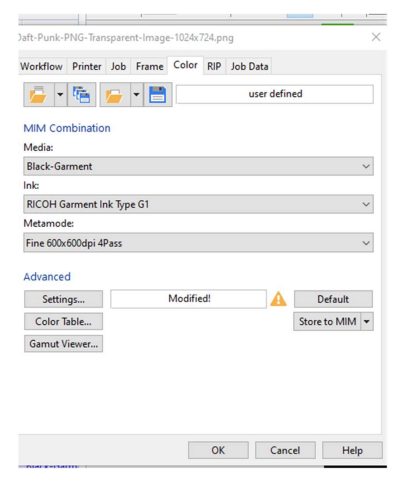
Advanced Settings
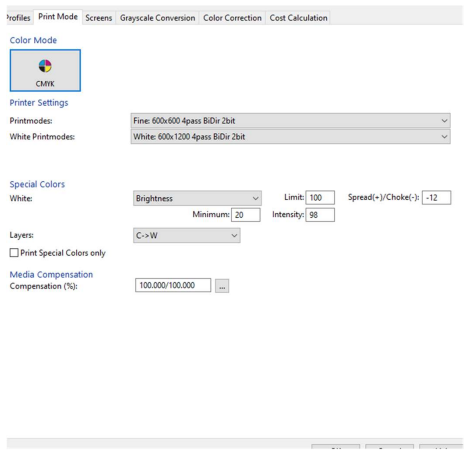
Print Mode
- White: Brightness - Choke set to ( -12) *if no choke is set the edges of the print will be a bit fuzzy because the powder (glue) sticks to the white ink.
- Minimum - Set to 20 *need some white ink for the powder to stick to
- Layers set C > W *default is W > C for normal DTG printing
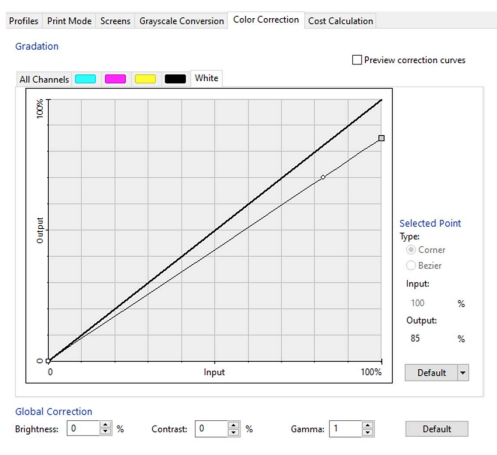
Color Correction Tab
On the color correction tab drop the white curve to have an output of 80 to 85% at 100% input.
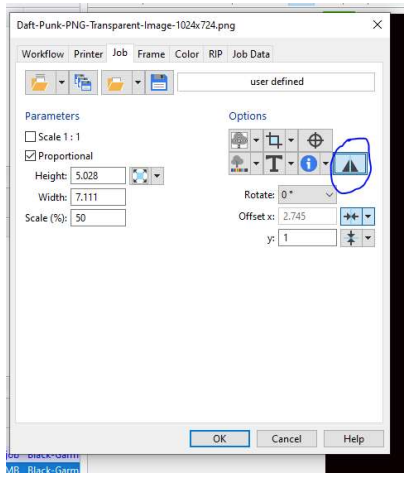
Job Tab
On the Job Tab - click the mirror image button.
*Otherwise, the image will be reversed on the shirt*
Direct-to-Film (DTF) Printing Recommendations
- Print on the dull side of the film
- Spoon or sift the powder on to the printed part of the film. Tilt back and forth at least 5 times so that the powder is covering all the printed area and shake off any loose powder brush away any powder from the edges.
- Dry ink and powder by hovering with the heat press for 120 seconds, at 260° F – ink and powder side up.
- After that, make sure the shirt is free of wrinkles and put it on the heat press. Then flip the film over and place where you want the graphic on the shirt.
- Heat press using heat press paper (Teflon is best but normal heat press paper will do) at 260° F for 20 seconds.
- Cold peel - let the film cool to room temperature (approx. 3-5 min) then gently peel the film and the ink will remain on the shirt. (Note hot peel film works as well - gently peel the film off the shirt immediately.)
- Heat press at 260° F for an additional 10 seconds (with press paper) to eliminate any remaining moisture.
See additional information
If you are having trouble on how to use the DTF method...
Please don’t hesitate to reach out to us for further assistance via email at service@ricoma.com or by visiting our support page at www.ricoma.com/US/support.