When an error message is displayed on your printer’s control panel, this means your printer encountered an issue that needs to be resolved before normal operation can begin. In the case of an image/design being printed multiple times, this is likely a result of an error that occurred in the printing job queue such as a software malfunction or a printing job being mistakenly duplicated multiple times.
Luminaris 200 White Toner Transfer Printer (Control Panel)
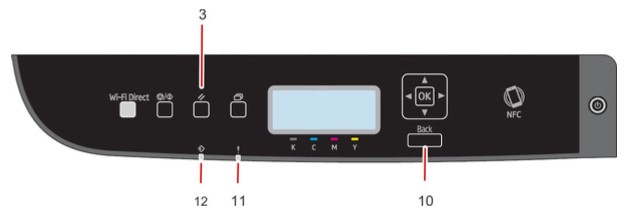
Below you will find essential buttons for printing jobs and error indicators:
Button #3- (Job Reset Key): Cancels the current job being printed.
Button #10- (Back Key): Cancels the last operation or returns to a previous page on the main menu.
Indicator Light #11 - (Alert Indicator): This indicator flashes red when an error occurs. If it flashes yellow, that means your toner is low.
Indicator Light #12 - (Data-In Indicator): This indicator flashes when your printer is plugged into a computer and is receiving data. If the indicator light stays on, that means there is currently a print file stored on the machine.
What Does a “SC500” Error Message Mean?
For this specific error message, we recommend you reach out to us at service@ricoma.com for detailed instructions. Printers that display a “SC500” indicate a FUSER ERROR.
Solving the “Repeated Image” Issue
In the case of an image printing multiple times, this mainly has to do with a miscalculation in the printing job queue or a glitch with the LuminRIP software.
See below on how to use your LuminRIP software:
The LuminRIP software has three main features that help you control what happens to your design before you send it to print. These three features are the Queue, Page and Job tabs.
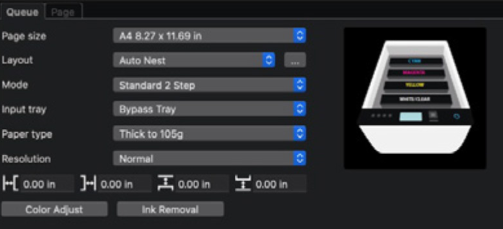
The Queue tab allows you to apply settings that affect every print job going forward. If you have multiple photos in your queue and decide to print them back-to-back, the settings you have saved in your queue will transfer to each of those print jobs if you do not change the settings of the individual job.
In this tab, you can control:
- Page Size
- Layout
- Mode
- Input Tray
- Paper Tray
- Resolution
- Positioning Tools
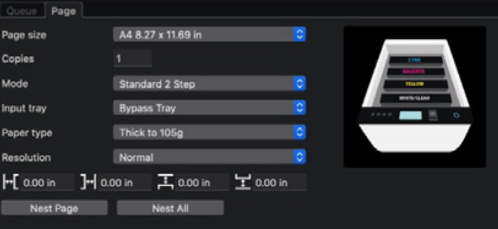
The Page tab allows you to control the aspects of your page and how your image will look on the page you will be printing on.
In this tab, you have access to the following features:
- Page Size
- Copies
- Mode
- Input Tray
- Paper Tray
- Resolution
- Positioning Tools
- Nest Page
- Nest All
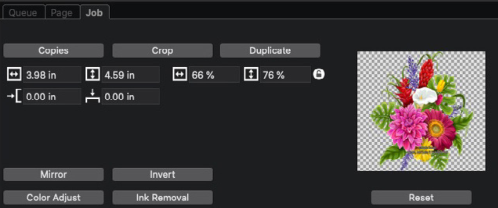
The Job tab allows you to adjust and edit the image or design you are working with before you send it to print. In this tab you have access to the following tools:
- Copies
- Crop
- Duplicate
- Color Adjust
- Ink Removal
- Invert
- Reset
- Dimension and Placement Tools
Navigating through the Queue (Your Printing Jobs)
The Queue, Page and Job tabs can be used to adjust images in the Overprint, Underprint or CMYK printing queues below:
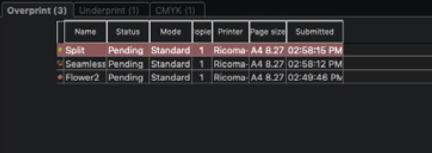
Printing queues help you manage printer pages and jobs or each type of printing you want to do, so you can easily manage your designs individually or apply one printing setting to all of them.
To remove an item from any of your queues, right-click the item you wish to delete and select the “Remove” option.
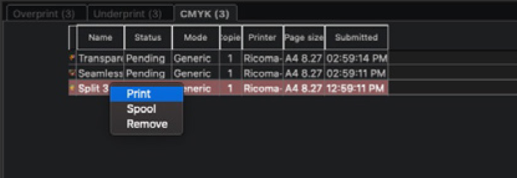
To learn more about the tools featured in these sections and how you can use them to edit, refine and prepare your image for printing, see the LuminRIP Software Manual.
Recommended Troubleshooting Steps to Clear Error
- Make sure there is no toner build up and that a transfer sheet is not jammed into the fusing unit.
- If there is a transfer sheet jammed into the fuser unit, remove it and run 10 sheets of regular copy paper through the machine. This should also remove any buildup.
- If you cannot remove the jammed transfer sheet or the buildup does not come out after running 10 sheets or regular copy paper through the machine, you will need to replace the fusing unit.
Need Additional Assistance?
If you are still encountering a “SC500” error message or multiple printed images...
Please don’t hesitate to reach out to us for further assistance via email at service@ricoma.com or by visiting our support page at www.ricoma.com/US/support.